

Tutorial 5
TJoining multiple tables in a single results grid
Wed, 02/10/2010 – 20:45 — NuVu Support Team
This tutorial assumes you have the knowledge gained from working with the previous tutorials. After this tutorial you will have the ability to select multiple (related) tables within any query.
Perform the following steps:
- If the Query Designer Tool is already running, please close it down. Invoke the NuVu Query Designer from the NuVu Query program group from the windows Start menu. The main NuVu Query Designer window will be displayed, and a welcome dialog window will also be displayed that shows recently saved/opened queries. We are going to create a new query from the previous query (tutorial4), so double-click on the ‘tutorial4′ item that should be displayed inside the Welcome dialog window (if you have successfully performed the previous tutorial and saved it as specified in that tutorial with a name of‘tutorial4′). The original query will open inside the Designer. We need to now save this as ‘tutorial5′ before we start working with the query, so click on theFile->Save As menu item and advise a new Query name of tutorial5 when the save properties are displayed. Click the
 button to save the query with the new advised name.
 - Click the
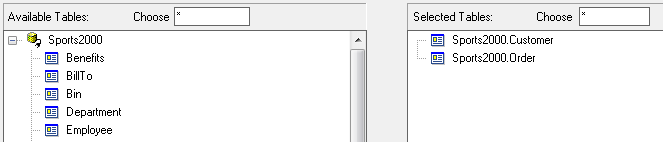
 (Select Tables) button on the toolbar to invoke the Table Selection dialog window. The window shows a list of Available tables to choose from, as well as a list of Selected tables (which should only have a single item in it, being Customer).
 - Double-click the Order table to automatically transfer it across to the list of selected tables. The window should look as follows:
- Click the
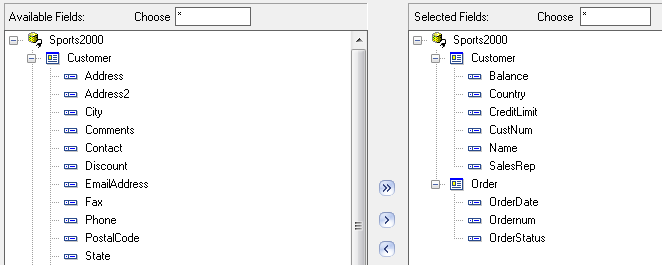
 button to proceed to the field selection dialog window. This window is identical in functionality to the Table selection window, except it shows a list of available fields for each of the tables selected for the query, as well as a list of selected fields. When first invoked, you will see that the list of selected fields only includes items from the Customer table.
 - Double-click the OrderDate, OrderNum and OrderStatus fields to automatically transfer them across to the list of selected fields. The window should look as follows:
- Click the
 button. The main Query window will now be displayed, and you will see that there are now new columns in the grid, being the fields that you chose for the Order table.
 - Click the
 button to start execution of the query. A dialog window will appear briefly indicating the various steps that are being performed. Once the query results have been retrieved, this dialog window will disappear and the results will be shown inside the grid on the designer window, as shown below:
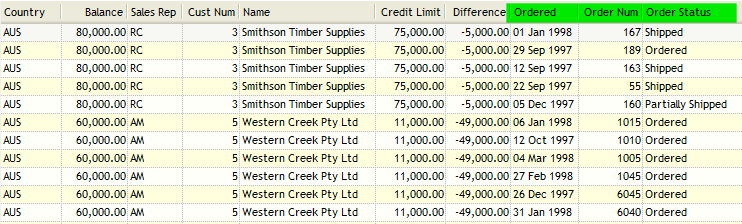
- Note the new columns showing information from the joined Order table. Also notice that the customer information has been repeated for each order row that is linked to the customer.
- Finally we will save the changes made to this query (as this will form the base query for the next tutorial), so simply click the
 button and close down the query tool.
We are complete with the tutorial. An exported query containing this tutorial is available by right-clicking here and choosing Save Link As (Firefox) or Save Target As (Internet Explorer) to save the query import format file to a file on your hard disk, and then importing that query into the query tool (hint: choose File->Import Query from the main menu of the Query Designer).
End of Tutorial