

Tutorial 1
Simple customer selection, sorted by Country
Tue, 04/27/2010 – 08:05 — NuVu Support Team
This tutorial will assume you have NO knowledge of the workings of the NuVu Query Designer. After this tutorial you will have the knowledge to create queries against any database within your repository, and be able to select tables/fields from the database and sort the contents of the selected table and display the results.The demonstration query will select the a few fields from the Customer Table from the Sports2000 data source, and advise sorting to present the data in a different sequence from that retrieved from the underlying database. The final results are shown as per this example: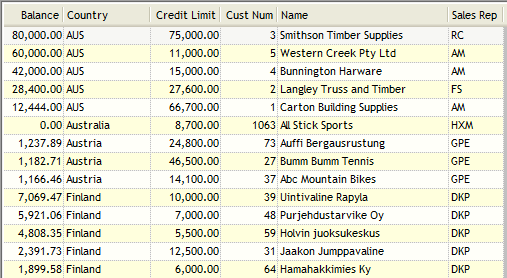
To create this query, perform the following steps:
- Invoke the NuVu Query Designer from the NuVu Query program group from the windows Start menu. The main NuVu Query Designer window will be displayed, and a welcome dialog window will also be displayed that shows recently saved/opened queries. We are going to create a new query from scratch, so ensure that the ‘Start a new Query’ option is selected and then click the OK button.
- Select the Sports2000 database from the list of available datasources by highlighting the Sports2000 entry in the ‘Available’ list of items, and then double-clicking to transfer to the list of ‘Selected’ items. If you have started from a fresh install, the Sports2000 datasource will be the only available one to choose.
- Click the
 button to proceed to the next step.
 - You will now be presented with a list of ‘Available’ tables to select from. This tutorial will only demonstrate the extraction of data from a single table, so double-click the ‘Customer’ table to select and transfer it to the list of ‘Selected’ items.
- Click the button to proceed to the next step.
- You will now be presented with a list of ‘Available’ fields to select from. Please select the following fields: Balance, CreditLimit, Country ,CustNum, Name, SalesRep. You can simply double-click each item to transfer it to the list of ‘Selected’ items, or hold down the control key and click on each of the fields and then hold down the left mouse button and drag them across to the ‘Selected’ panel and then release the mouse button to drop them onto the list.
- Click the button to proceed to the next step.
- You will now be presented with a list of ‘Available’ fields to sort by. In our example we will want to sort by Country, and then within each Country, we want the balance shown, but in descending sequence, so that the highest balance to the lowest balance is shown per Country. To do this, double-click the‘Country’ field first to transfer it across to the list of ‘Selected’ items. Then double-click the ‘Balance’ field to transfer that across as the second sort field. The only thing left to do is advise that the ‘Balance’ field must be shown in descending order sequence (within the parent sort field of ‘Country’). Highlight the ‘Balance’ field in the ‘Selected’ items list, and then click the
 button in order to specify that the sort sequence for this field must be descending.
 - Click the
 button to end the query wizard – we are now ready to run the query.
 - Click the
 button to start execution of the query. A dialog window will appear briefly indicating the various steps that are being performed. Once the query results have been retrieved, this dialog window will disappear and the results will be shown inside the grid on the designer window, as shown below:
 - Note the ‘Country’ column is showing sorted by Country, and the Balances are shown in descending sequence for each country.
- Finally we will save this query, calling it tutorial1 as this query will form the basis for all other tutorials in this set. Click on the
 button to save the query – the standard query properties window will be displayed – so on this window just advise a query name of tutorial1 and then click the OK button to save the query.
We are complete with the tutorial. An exported query containing this tutorial is available by right-clicking here and choosing Save Link As (Firefox) or Save Target As (Internet Explorer) to save the query import format file to a file on your hard disk, and then importing that query into the query tool (hint: choose File->Import Query from the main menu of the Query Designer).
End of Tutorial